
Holiday Happy Hour: DIY Wax Sealed Glassware Tags
Thank you Decoy for sponsoring this post. Find your own bottle here for your holiday celebrations!
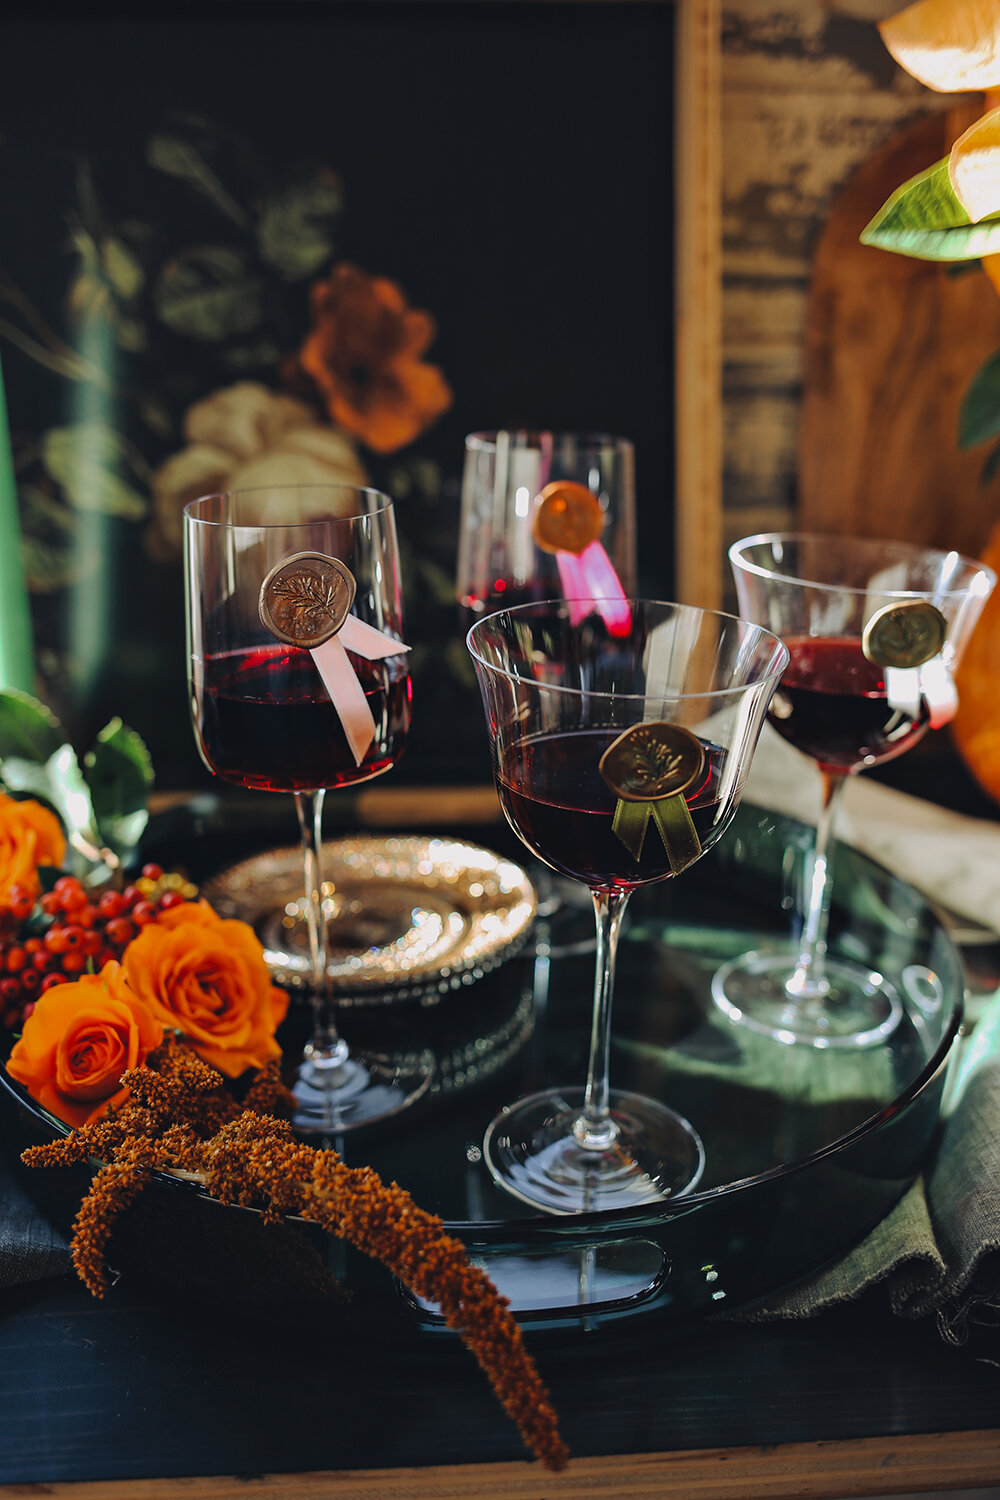
Holy Moly! Here we are…standing officially at the start of the holiday season. Celebrations Start Here and the next several weeks are bound to be filled with joyful gatherings, great conversations…and lots of happy hours! This year I’m bringing a little extra style to the occasion…and our glass of wine…with a pretty simple, but incredibly chic DIY: Wax Sealed Glassware Tags.
So why the importance for drink tags, you might ask? There’s an ongoing joke in our household that you need to keep one eye on your wine glass or someone (or in our family’s case - multiple people) will end up mistaking your glass for theirs and ultimately drink from all the beverages. This is especially true when cooking in the kitchen together.
Needless to say, marking your glass has become rather a common occurrence at our gatherings plus the holidays are the perfect excuse to kick up the table decor and skip the sharpie initialed plastic cup (although I’m not judging - there are times for all these things).
This time of year can be too busy and a little stressed so we’re going to focus on the basics of what make a holiday happy hour well designed in addition to our crafty customization. Whether you’re setting the table for two or inviting over your whole crew, here are a few things to consider making your gathering feel extra special:
Stick to a color theme: We can all get a little heavy handed with the decorations this time of year. When styling up my perfect happy hour, I like to keep things pretty simple and focus on spending time with my guests. For a polished look, pull out a few table top elements in a cohesive color palette - rust and emerald is my kind of color combo, especially since they work for both Thanksgiving and Christmas. Got to love decor that can work double duty! Pick out few choice items like a new serving tray, table runner, or cocktail napkins that will make your spread look pulled together with your chosen color theme.
Add in a little freshness: No need to get crazy spending too much on a centerpiece when when botanical clippings from the yard and a few fresh flowers from the grocery store can make a huge impact. Think of this as an opportunity to play with texture and mix and match a few different items like berries, branches, blooms and even floral filler…as long as they’re all in the same color story they will look refined and even better, be on budget.
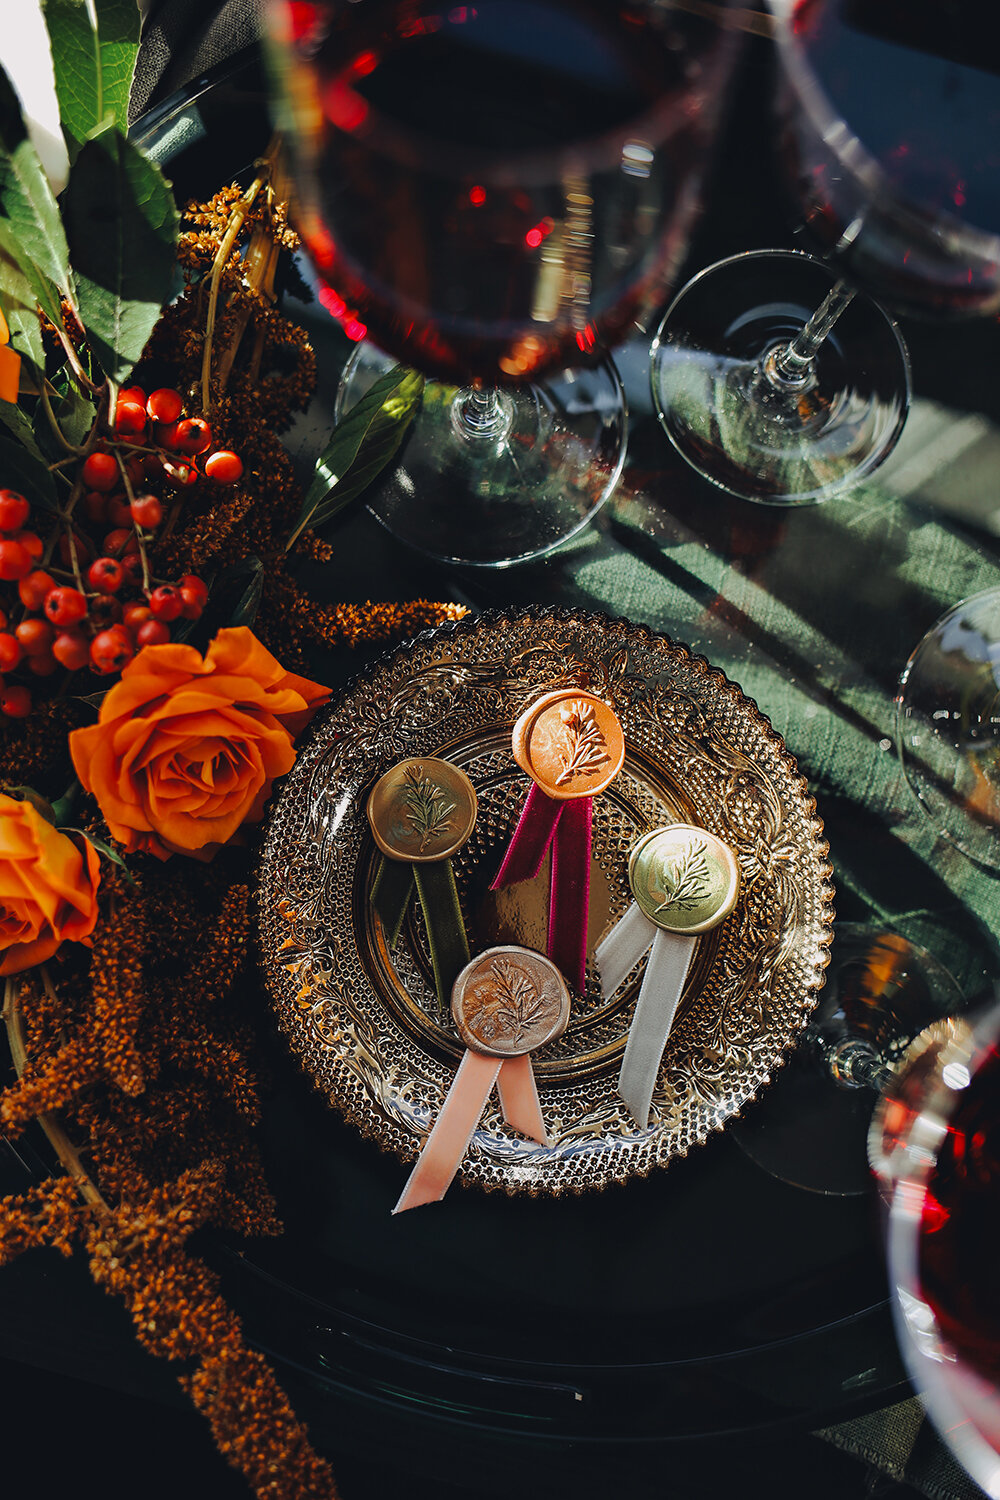
Make it Personal: Here’s where the DIY drinkware comes into your decor plan. What I especially love about this particular project is all the different creative ways you can run with it. Different wax stamp designs, different color combos…to velvet ribbon or to go gilded gold!? Sky is the limit and there really is just so much fun you can have creating your own unique happy hour style with this simple, yet unexpected personalized pop.
Okay, we’ve got our style game plan…now it’s time to grab some wine (I’m serving up Decoy Pinot Noir) and get ready to put the crafty into your celebration! Trust me, this DIY is pretty easy and you only need a few supplies which I’ve outlined below.
Ready to fire up those glue guns and get ready to kick off this holiday happiness!? Let’s go!


DIY Wax Sealed Glassware Tags

MATERIALS
Glue Gun (one for glue, and an extra one if using wax sticks)
Glue Sticks
Scissors
Wax Paper
Bowl of ice water
HOW TO
Prepare sealing wax per specifications, melting a small dollop of wax onto a sheet of wax paper for easy removal. Notes on wax: Traditional wax has a wick you can light with a flame for individual pressing while wax sticks can be used continuously with a dedicated glue gun (please know once you use a glue gun for wax sealing you will only be using it for wax and no longer for glue - trust me, it’s a mixed mess otherwise that you don’t want to get into).
Give yourself time and extra materials for practice. Wax seals take a little bit of working with for the right look. One helpful tip I discovered was dipping the metal seal into ice water before pressing onto melted wax for an easier time separating the two once cooled.
Once you’ve mastered your wax seals, hot glue individual ribbons onto the back of each wax seal, being careful not to touch the tip of glue gun onto the seal to avoid melting or bubbling. Finally, hot glue a set of magnets onto the backs of each - I found attaching magnets on top of ribbon rather than on the wax seal itself had a more secure attachment to the wine glass.
APPLICATION
Wax seal attaches to glass with the magic of the magnets positive/negative connection! Simply remove one magnet from the duo and reattach their connection through your glass.
As with any DIY, please be careful with construction. Take care when applying to the glass and make sure to test the connection between your particular glassware and make sure it is strong and stable before serving to guests. No one wants to be swallowing magnets! And as always…please consume responsibly.


Tis the season to Toast the Holidays with a little extra drink decor! I’m definitely looking forward to some extra time relaxing with friends and family … there will definitely be wine involved, and most likely a baked brie or two…not to mention this year there will be no mistaking which glass belongs to who! If you end up trying this DIY for your own happy hour, please tag me on instagram so I can see all the cool combos and colors you came up with.
Cheers to a stress free and stylish season my friends!
